폰트 적용하는데 꽤 어려움을 겪었다. 그래서 내용을 정리 해놓으려 한다. iOS와 Android 각각 적용해야 한다. 구글링을 하다보니 react-native-asset을 쓰는 방법도 있는 것 같은데 나는 아래의 방법으로 적용했다. 참고한 블로그들이 정말 도움이 많이 되었다.

iOS

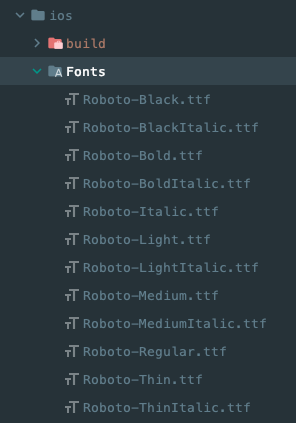
ios/Fonts 폴더를 만들어서 그 안에 폰트 파일을 복사한다.

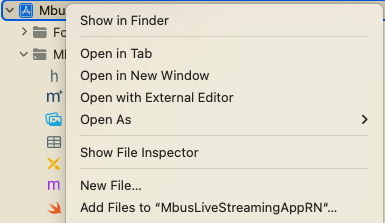
xcode를 실행하고 왼쪽 상단의 프로젝트명을 오른쪽 클릭하여 Add Files to "project_name"을 클릭한다.

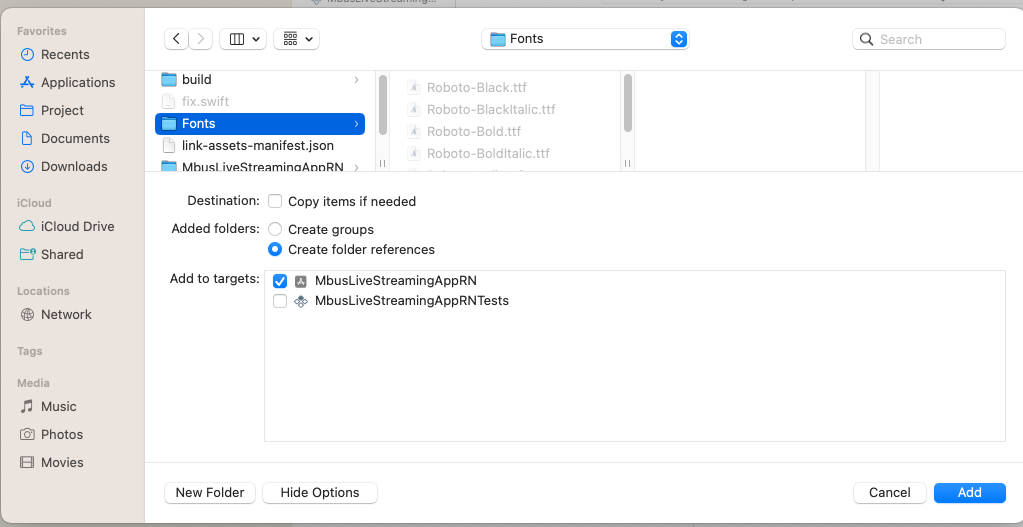
방금 생성한 ios/Fonts를 선택하고 아래와 같은 옵션으로 Add 버튼을 누른다.

왼쪽 상단의 프로젝트명을 누르고 나타나는 창에서 TARGETS를 프로젝트명을 선택한다. 위에 나타나는 탭에서 Info를 선택하여 Fonts provided by application key를 찾아 폰트명으로 항목을 하나씩 추가시킨다. 파일 형식과 소문자, 대문자 모두 똑같이 입력해야 오류가 발생하지 않는다. 일일이 추가하기 귀찮다면 ios/프로젝트명/Info.plist 파일에 내용을 추가해도 된다.

1
2
3
4
5
6
7
8
9
10
11
12
13
14
15
16
17
18
19
20
21
22
23
24
25
26
27
28
29
30
31
32
<key>UIAppFonts</key>
<array>
<string>AntDesign.ttf</string>
<string>Entypo.ttf</string>
<string>EvilIcons.ttf</string>
<string>Feather.ttf</string>
<string>FontAwesome.ttf</string>
<string>FontAwesome5_Brands.ttf</string>
<string>FontAwesome5_Regular.ttf</string>
<string>FontAwesome5_Solid.ttf</string>
<string>Foundation.ttf</string>
<string>Ionicons.ttf</string>
<string>MaterialIcons.ttf</string>
<string>MaterialCommunityIcons.ttf</string>
<string>SimpleLineIcons.ttf</string>
<string>Octicons.ttf</string>
<string>Zocial.ttf</string>
<string>Fontisto.ttf</string>
<string>Ionicons.ttf</string>
<string>Roboto-Black.ttf</string>
<string>Roboto-BlackItalic.ttf</string>
<string>Roboto-Bold.ttf</string>
<string>Roboto-BoldItalic.ttf</string>
<string>Roboto-Italic.ttf</string>
<string>Roboto-Light.ttf</string>
<string>Roboto-LightItalic.ttf</string>
<string>Roboto-Medium.ttf</string>
<string>Roboto-MediumItalic.ttf</string>
<string>Roboto-Regular.ttf</string>
<string>Roboto-Thin.ttf</string>
<string>Roboto-ThinItalic.ttf</string>
</array>

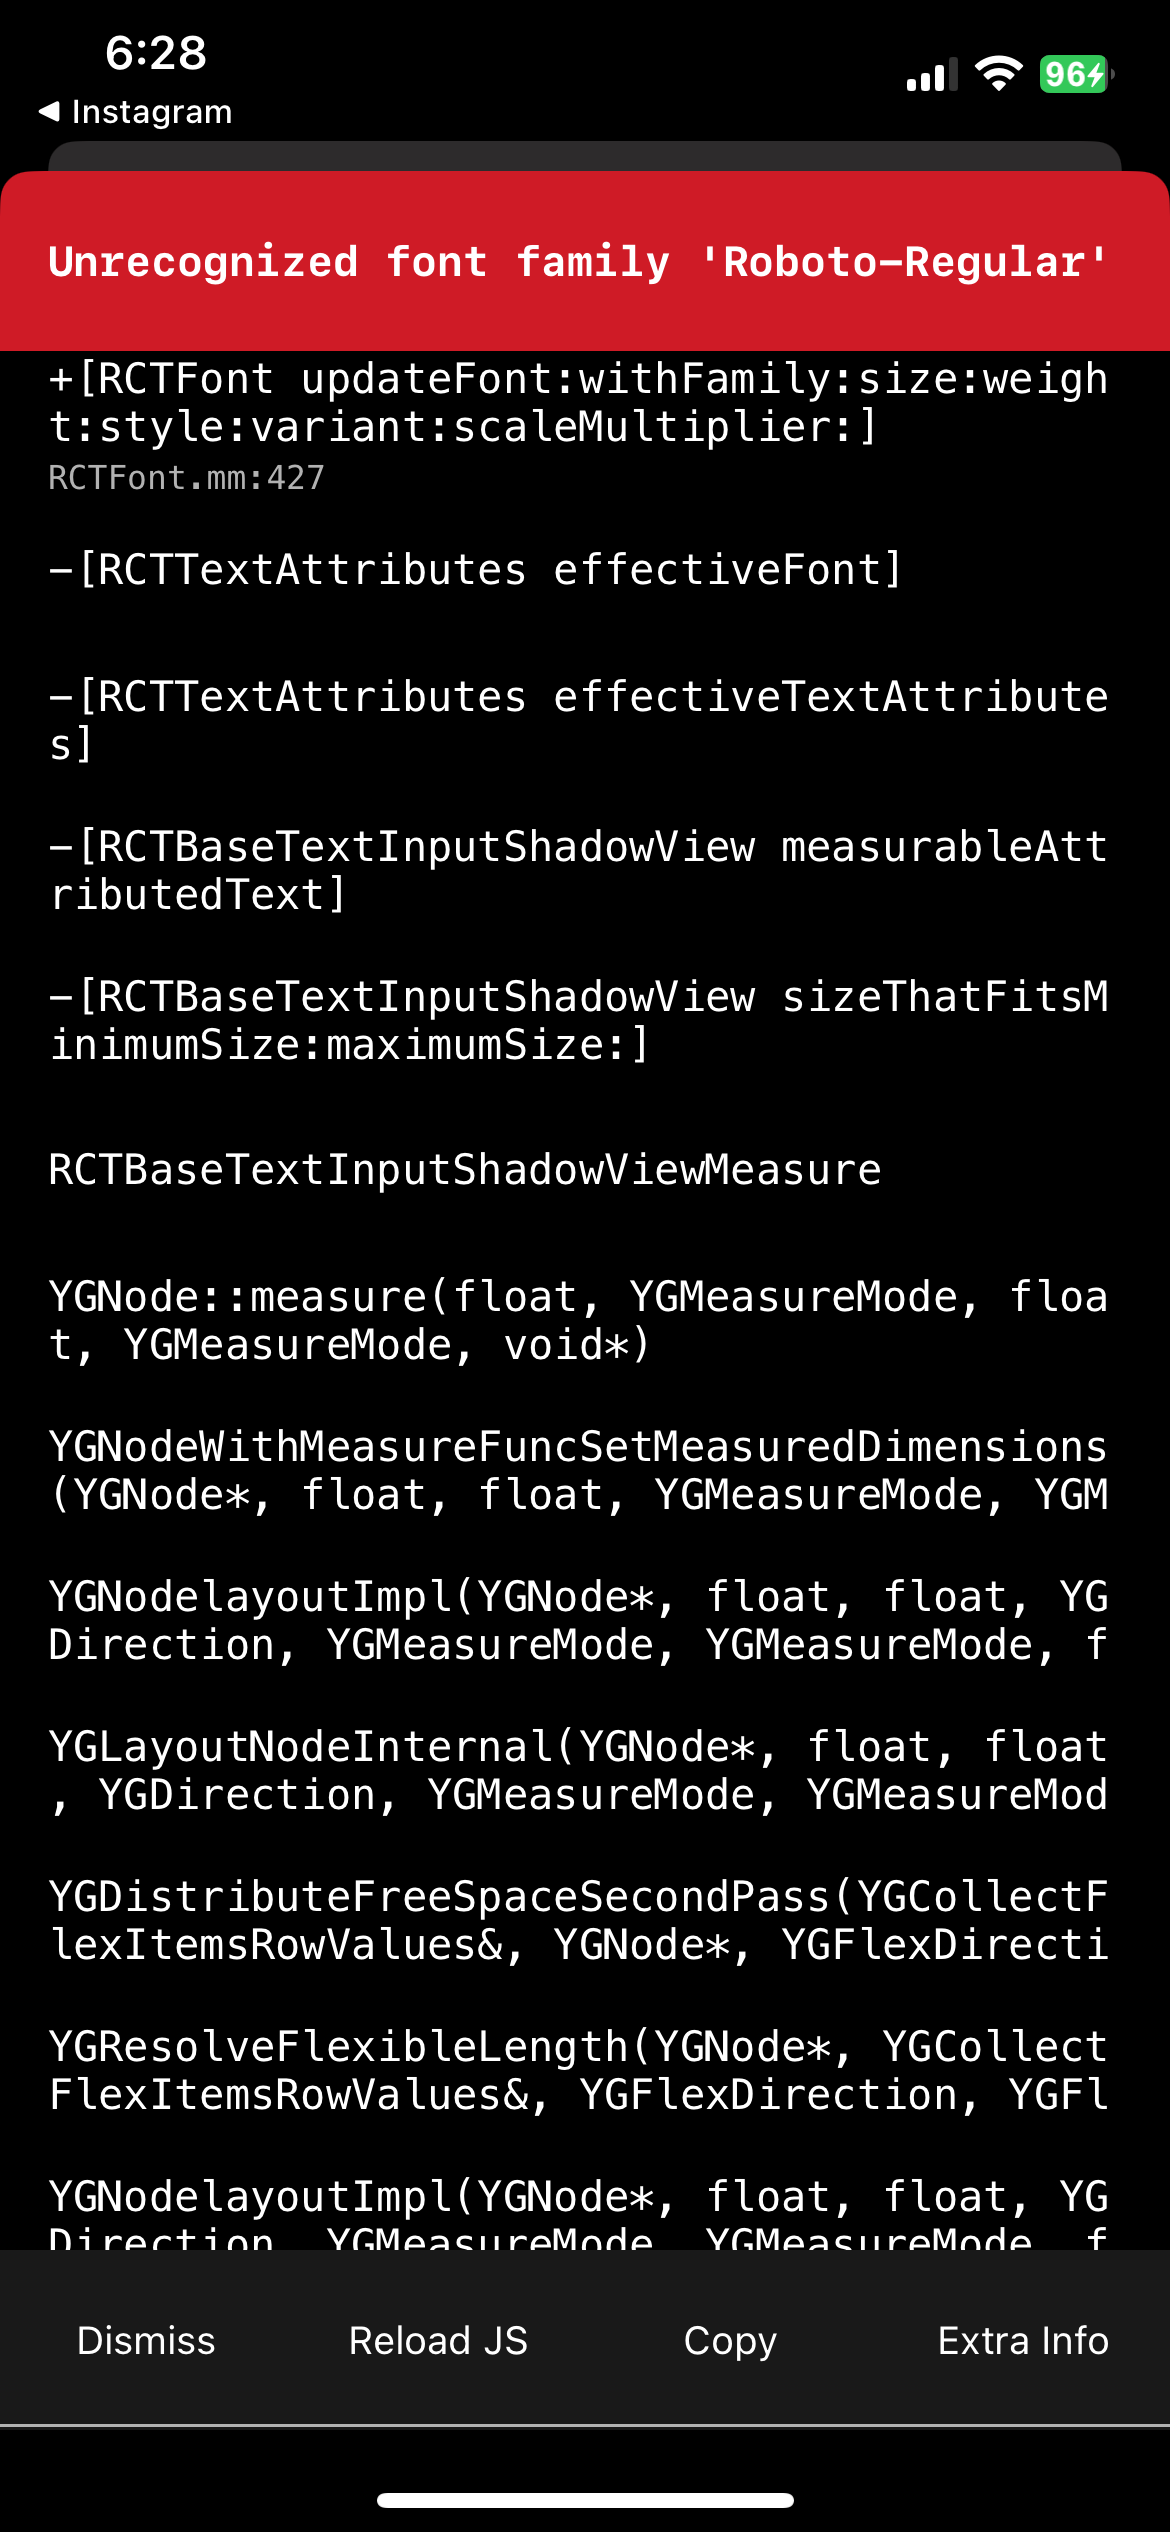
여기까지 하면 설정이 된다고 하는데 나는 한 번에 잘 되진 않았다. 앱을 빌드하면 아래와 같은 에러가 계속 발생했다.
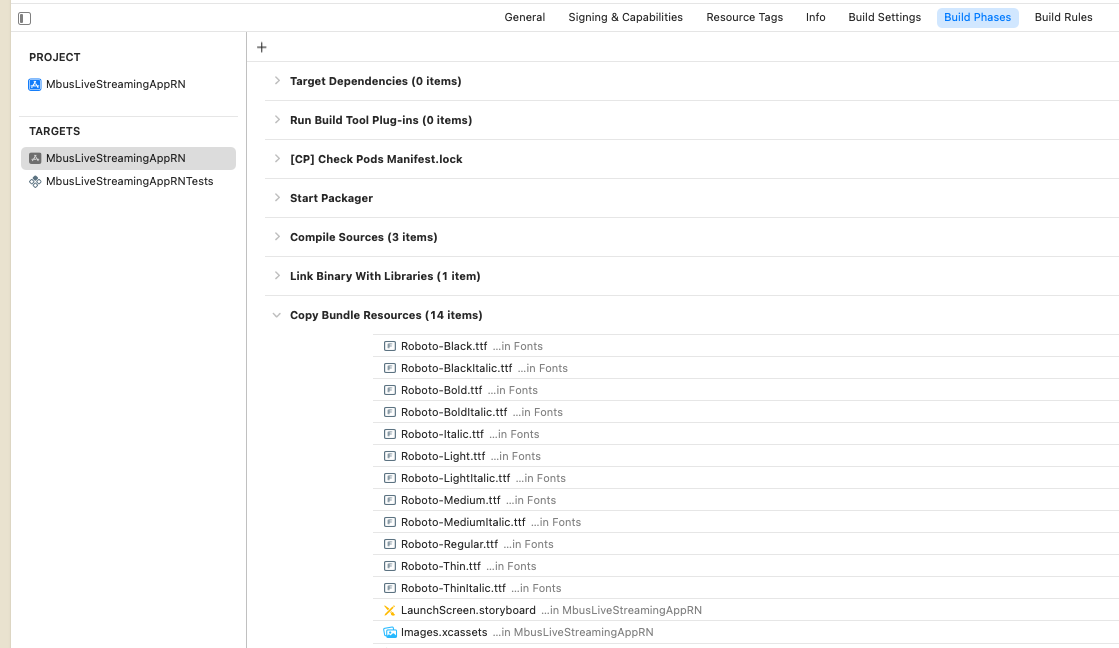
그래서 구글링을 하여 추가로 진행한 작업이 Build PhasesCopy Bundle Resources에 폰트 파일을 추가하는 것이다.

하지만 내 기억에 react-native-vector-icons를 적용하면서 폰트를 추가할 때는 Build Phases에 아이템이 중복으로 추가되어 다 삭제해서 적용했던 것 같기도 하다. 문제의 원인이 다양하게 있는 것 같으니 에러 메세지를 확인하고 위 두 가지 메뉴에서 이것저것 해보면 해결 할 수 있다. 🥲

Android

안드로이드는 iOS에 비해 간단하다.

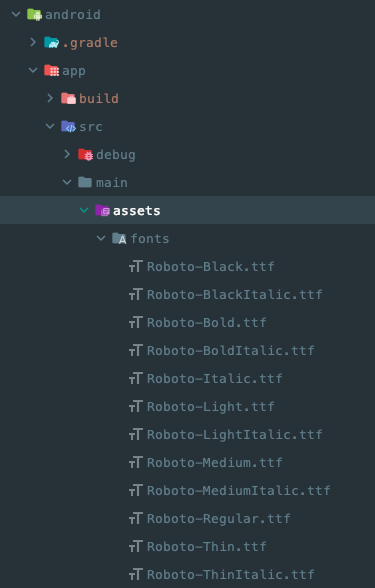
android/app/src/main/assets/fonts 폴더를 만들어 그 안에 적용할 폰트를 넣어주면 된다.

그럼 끝이다! 훨씬 간단하다.

native-base에 폰트 설정

위 설정을 모두 마치고 App.tsx 파일을 수정한다.

1
2
3
4
5
6
7
8
9
10
11
12
13
14
15
16
17
18
19
20
21
22
23
24
25
26
27
28
29
30
31
32
33
34
35
36
37
38
39
40
41
42
43
44
45
46
47
48
49
50
51
52
53
54
55
import {NativeBaseProvider, StatusBar, extendTheme} from 'native-base';

const theme = extendTheme({
fontConfig: {
Roboto: {
100: {
normal: 'Roboto-Light',
italic: 'Roboto-LightItalic',
},
200: {
normal: 'Roboto-Light',
italic: 'Roboto-LightItalic',
},
300: {
normal: 'Roboto-Light',
italic: 'Roboto-LightItalic',
},
400: {
normal: 'Roboto-Regular',
italic: 'Roboto-Italic',
},
500: {
normal: 'Roboto-Medium',
},
600: {
normal: 'Roboto-Medium',
italic: 'Roboto-MediumItalic',
},
700: {
normal: 'Roboto-Bold',
},
800: {
normal: 'Roboto-Bold',
italic: 'Roboto-BoldItalic',
},
900: {
normal: 'Roboto-Bold',
italic: 'Roboto-BoldItalic',
},
},
},
fonts: {
heading: 'Roboto',
body: 'Roboto',
mono: 'Roboto',
},
};

export default function App() {
return (
<NativeBaseProvider theme={theme}>
<Navigator />
</NativeBaseProvider>
);
}

폰트 설정만 잘 되었다면 간단하게 적용할 수 있다. fontConfignative-base 문서에 나온 내용을 그대로 쓴 것으로 원하는대로 수정해서 사용하면 된다.

참고